Bones Command-Line Interface
This document explains the Bones command-line interface included with WP Bones Boilerplate. It provides helpful commands for plugin development. You can start by running php bones and change the plugin namespace using php bones rename "My First WP Bones Plugin". It highlights the importance of using double quotes for arguments with spaces on Windows. The document also covers the deploy command to create a folder for submitting your plugin to the WordPress.org repository.
Overview
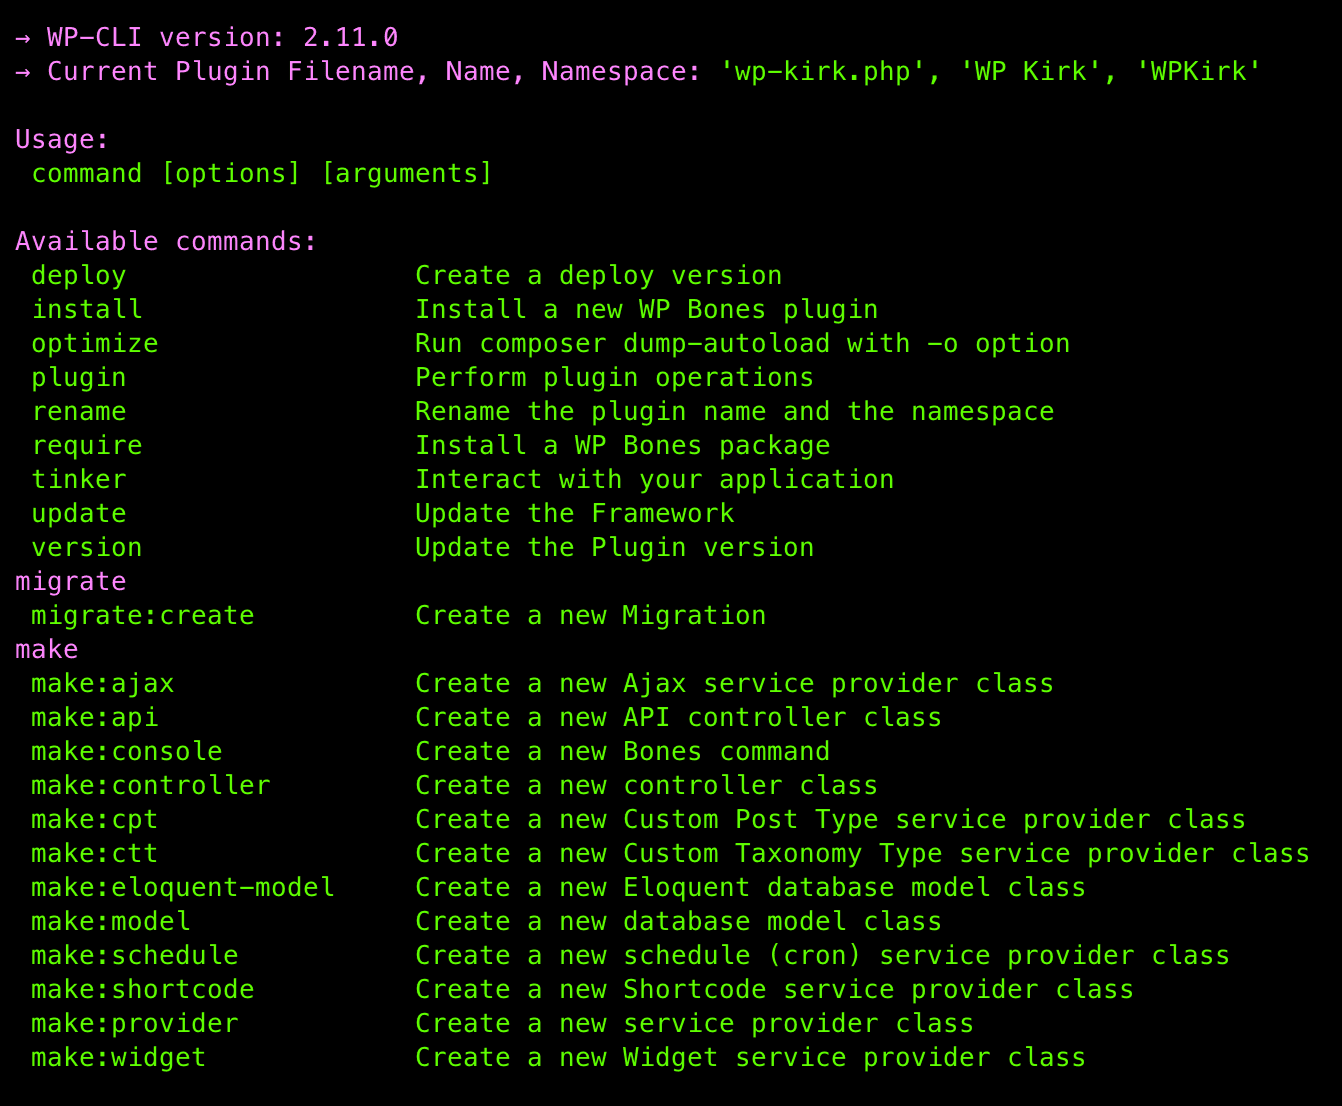
Bones is also the name of the command-line interface included with all our WP Bones Boilerplate. It provides a number of helpful commands for your use while developing your plugin. You will use the Bones command-line interface to start your development. First of all, try the command-line console by running:
> php bones
Then, you can change the plugin namespace from WPKirk to My First WP Bones Plugin, for example:
php bones rename "My First WP Bones Plugin"On Windows, the command line treats single quotes differently than double quotes. To ensure compatibility, always use double quotes for arguments containing spaces.
As you can see from the above command, the plugin name is enclosed in double quotes. This is because the plugin name contains spaces. If the plugin name does not contain spaces, you can omit the double quotes. Moreover, the plugin name is the first argument and you can skip the second argument if you want to use the namespace generated by the plugin name.
Great! You are quite ready to start developing.
Common Commands
deploy
When your plugin is ready, you can use the deploy bones command in order to create a new folder useful to submit your plugin to the wordpress.org repository.
php bones deploy your-path/mydeployRemember that you can ask for help by using:
php bones deploy --helpUsage:
deploy <path>
Arguments:
path The complete path of deploy.
[--wp] You are going to release this plugin in the WordPress.org public repository.
[--create-zip] Creates an installable plugin zip file instead of deploying in a directory.
--pkgm=<package-manager> Forces the deployment to use the specified package manager, Eg. npm, yarn, ...
--no-build Forces the deployment to skip the build process.The --wp option will create a deploy folder with the necessary files to submit your plugin to the WordPress repository. For further information, see here.
--wp
Starting from WP Bones v1.5.0 we added a new option --wp to deploy the plugin to the WordPress repository. This option will create a deploy folder with the necessary files to submit your plugin to the WordPress repository. For further information, see here.
In the mydeploy folder, you will find only the necessary files to run your plugin.
Without the --wp option the developer’s resources/assets folder will be removed.
Customize Deploy
Of course, you may customize the deployment process by editing the deploy.php file. In this file, you can add your own commands to run before and after the deployment. You will also find some actions and filters to customize the deployment process.
For example, you can add any custom command to run before the deployment by using:
/**
* Fired when the deploy command is started
*
* @param object $console Instance of WPBones Console
* @param string $path Destination path
*/
add_action('wpbones_console_deploy_start', function ($console, $path) {
    // Do something
}, 10, 2);
Or change the list of skipped files by using:
/**
* Filter the list of the folder to skip for the deploy version
*
* @param array $folders List of folders to skip
* @return array List of folders to skip
*/
add_filter('wpbones_console_deploy_skip_folders', function ($folders) {
    return $folders;
});
→ See more about Actions & Filters.
install
The install command is used to install the WP Bones framework. You can use the install command by running:
php bones install→ See more about Installing WP Bones.
optimize
The optimize command uses the composer dump-autoload -o command to optimize the autoloader. You can use the optimize command by running:
php bones optimizerename
The rename command is used to rename the plugin namespace. You can use the rename command by running:
php bones rename "My First WP Bones Plugin"→ See more about Naming your Plugin.
require
The require command is used to install third-party packages. You can use the require command by running:
php bones require <PackageName>Under the hood the require command uses the composer require command. But it also renames the package name in the composer.json file.
We recommend using this command instead of composer require because by doing so, an automatic renaming will be performed.
tinker
The tinker command is used to open an interactive shell. You can use the tinker command by running:
php bones tinkerNow you can run any PHP code
>>> echo "Hello"
Hello
You can also use any WordPress function
>>> echo get_bloginfo('version');
6.6.2
update
The update command is used to update the WP Bones framework. You can use the update command by running:
php bones update→ After updating the WP Bones framework, have a look at the Changelog to see what’s new.
→ And you may also check the Core Plugin Files to see if there are any changes.
version
The version command is used to version your plugin. You can use the version command by running:
php bones version 1.0.0The above command will update the plugin version in the main plugin file and in the readme.txt file.
Despite PHP Bones supporting semantic versioning, we suggest you use the same version in the readme.txt file and in the main plugin file. In short, avoid using the v prefix in the version number.
You can see the help by using:
php bones version --helpreadme.txt > 1.4.0 (Stable tag: 1.4.0)
wp-kirk.php > 1.4.0 ( * Version: 1.4.0)
Usage:
version [plugin version]
Arguments:
[plugin version] The version of plugin. Examples: '2.0', 'v1.2', '1.2.0-rc.40', 'v1-beta.4'
[--major] Increment the <major>.y.z of plugin.
[--minor] Increment the x.<minor>.z of plugin.
[--patch] Increment the x.y.<patch> of plugin.
[--pre-patch] <prefix> Increment the x.y.<patch>-<prefix>.<i> of plugin.
[--pre-minor] <prefix> Increment the x.<minor>.z-<prefix>.<i> of plugin.
[--pre-major] <prefix> Increment the <major>.y.z-<prefix>.<i> of plugin.The php bones version command can handle the version starting from the current version of the plugin. You can use the following options:
--major
Increments the major version number. For example, if the current version is 1.0.0, the new version will be 2.0.0.
--minor
Increment the minor version number. For example, if the current version is 1.0.0, the new version will be 1.1.0.
--patch
Increment the patch version number. For example, if the current version is 1.0.0, the new version will be 1.0.1.
You can also use the --pre-patch, --pre-minor, and --pre-major options to increment the version with a prefix. For example, if the current version is 1.0.0, the new version will be 1.0.1-rc.1.
The default prefix is rc. But you can change it by using:
php bones version 1.0.0 --pre-patch betaThe above command will update the plugin version to 1.0.1-beta.1.
plugin
The plugin command is used to get and check your plugin. You can use the plugin command by running:
php bones pluginYou will see the current header of your main plugin file.
/**
 * Plugin Name: WP Kirk Demo
 * Plugin URI: https://github.com/wpbones/WPKirk
 * Description: WP Bones Demo WordPress plugin
 * Version: 1.6.1
 * Requires at least: 6.2
 * Requires PHP: 8.2
 * Author: Giovambattista Fazioli
 * Author URI: http://undolog.com
 * License: GPLv2 or later
 * License URI: http://www.gnu.org/licenses/gpl-2.0.html
 * Text Domain: wp-kirk
 * Domain Path: languages
 *
 */
Check the help for more options:
php bones plugin --helpUsage:
php bones plugin [options]
Available options:
--check-header Check the plugin header--check-header
The --check-header option is used to check the plugin header. You can use the --check-header option by running:
php bones plugin --check-headerCreators
The Bones command console provides a set of commands to create some base classes. For example, you can create a Custom Post Type by using:
php bones make:cpt MyCustomPostTypeClass Nextra